Wednesday, December 19, 2007

high on envelope glue

I started making Christmas cards back in November. I collected last year's cards from several friends, intent on remaking them into new cards. It got a bit tedious, so I finished up the cards for my office with regular old scrapbook supplies and blank white cards.

DSCN3480.JPG

DSCN3482.JPG
a somewhat blurry closeup of one of my favorite cards. Most of them use the main image from the card, scrapbook paper, and some silver-inked stamps. I scored the stamps last year at Michael's after Christmas in the 75% off sale. I definitely got my $4 worth this year, as I used them in some form on every card!!

iPod, i heard knew ye

,While I was out running six miles in the freezing rain/snow Saturday morning, this is how my dog was occupying himself:

DSCN3496.JPG

DSCN3495.JPG

Sunday, December 9, 2007

favorite scarf

for the Handcrafter's Holidays at SewMamaSew

I love handmaking gifts for the holidays. When I was younger, it was often ornaments with my school photo in them. Now, they are more often than not knitted scarves. My first attempts were simple all knit-stitch scarves for my sister, made out of Homespun. I've graduated to many finer yarns and more difficult patterns.

One I enjoy making, and knits up fairly quickly (I am a slow knitter) is from Last Minute Knitted Gifts, and is basically *K1,P1*K1, however wide you want to make it. I have made it with Malabrigo and a coordinating kidsilk/halo-y yarn. The one below is for my friend Steph, and was made for her last year for Christmas. I love the variations in Malabrigo, and with the right coordinating yarn, it looks great!

Stephanie's scarf

Sunday, December 2, 2007

How to refinish a floor, or at least how I blundered through it

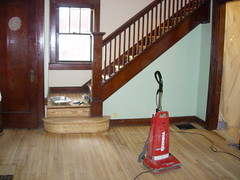
Last week I refinished my 80-year old wood floors, and they were worth several days of work, and a week of staying at my parents.

This website was of invaluable help (recommended by my uncle), and I followed pretty much the same steps. It's best to put the varnish on during the day, or at least with plenty of bright light. Putting coats on in the dark is a recipe for disaster. I cannot stress this enough. Invest in a Mouse by Black & Decker hand sander. It's great for getting into all of the low spots and corners. We actually went out and bought a second one to speed things up!

Ingredients:
1. Varathane EZ four-head orbital sander, rented from Lowe's for $35/day (two day rental)
2. Four gallons of Varathane Oil-Based Satin Finish for floors (used liberally, discarded quite a bit at the end, really 3.5 gal)
3. Two palm sanders, two Mouse sanders, plenty of 60 grit sandpaper
4. 12 packs of 36-grit, 6 packs of 50-grit, 2 packs of 80-grit
5. Four lambswool applicators
6. Two dropcloths
7. One pack of 120-grit or 150-grit for scuff coats
8. 12 two-packs of tack cloths from Lowe's
9. Four varnish brushes
10. One large back of chocolate
11. Two parents, one sister, and two friends to help

We sanded for two days, starting with the 36-grit on the floor sander. We probably should have stripped off the old old varnish, but instead spent a day trying to sand it down. That included standing on the orbital sander (not safe!) to really cut into the finish. Once we got the finish off, it was smooth sailing. Again, the Mouse sanders were really the best tool to knock down the high spots and dig into the low spots.

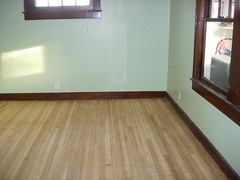
We put on four coats, letting it dry at least 24 hours between coats. This is longer than necessary, but because of my day job, this was our only option. I do recommend giving it ample time to dry to prevent hazing or crackling. I stayed at my parents house while the varnish dried- since it was oil-based, the fumes were extremely strong. My throat tasted like burning for hours after each coat.

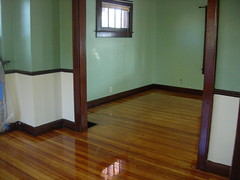
All in all, the process took over a week. Two full days of sanding, and then around two hours a day for four days to varnish, then three days to cure.

finally an after

One of my largest projects of the year is coming to a close, and not a day too soon. I have been wanting to put up my Christmas tree for over a week, but was unable to because I was waiting for my floor to dry. That's right, I finally refinished my downstairs floors.

The progression...
Before:
House

Post-Carpet:
dining room

Post two days of sanding:
DSCN3421.JPG

DSCN3419.JPG

DSCN3417.JPG

After the first coat (will dry a satin finish):
DSCN3426.JPG

Intense Debate Comments